Hello Stampers!
Thank you for joining us once again for the Stampers' Dozen Blog Hop! This month we are showcasing Sale-a-Bration (SAB) accessories. My favorite one is the Irresistibly Yours Designer Series Paper on page 15 of the SAB brochure; item 138635.
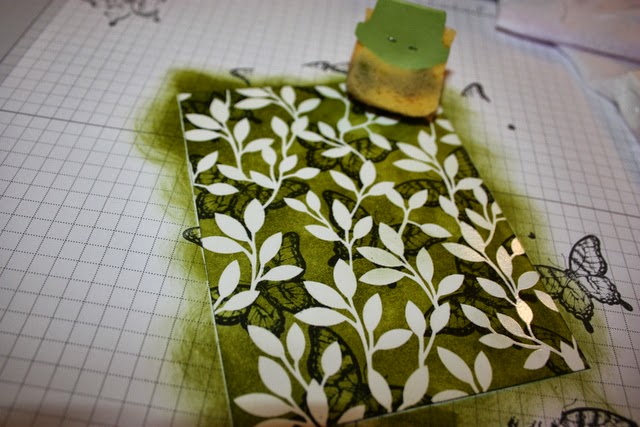
I was inspired to make this card by Linda Heller who stamped onto the DSP with a background stamp before sponging it with color. So, on this card I used a butterfly from Papillon Potpourri to stamp onto the Irresistibly Yours DSP with Memento Ink. Then, I rubbed it with a tissue and had a BIG BLACK MESS! So...learn from my mistake. Once you stamp black ink onto this paper, cover it with a tissue and roll your brayer over it. Lift off and repeat again. Finally, rub the leaves clean with a kleenex or used dryer sheet or Swiffer cloth.
Next, I sponged Old Olive ink all over the DSP then buffed the leaves off with a swiffer cloth.
Next, I wanted to make a butterfly look as close to a Monarch butterfly as I could. So, I stamped the Swallowtail butterfly in Pumpkin Pie ink onto Daffodil Delight cardstock. After running the butterfly thinlit through the Big Shot with Basic Black card stock, I used my 2-way glue pen to adhere it to the stamped image and then fussy cut it out.
After adhering the Irresistibly Yours DSP to a Pumpkin Pie card base, I adhered, with glue dots, approximately 5 inches of burlap ribbon "banner cut" at one end to the face of the card. Finally, after molding the butterfly gently with my fingers, added the butterfly to the ribbon with a string of glue dots along the torso of the butterfly.
That is it! I hope you will try stamping on the Irresistible Yours DSP before sponging color on it! Have FUN with this paper. Oh, how I wish this was a mainstay in our catalog. Unfortunately, it is not so, if you don't have any, hurry and place an order before March 31st to get your FREE Designer Series Paper!
It is time for you to hop along to Patty Chenail's blog to see what that talented lady has to share with us. It will be a surprise for me too! Or, if you missed it, you can go to Carol Payne's blog by clicking on the "Previous Blog" button. Or, you can scroll down before you leave for another little tip about what can be done with that butterfly!
Happy Stampin'!
Judy
Now...see what else I did with the Butterfly...
I made this name badge to wear at Leadership. OK. The first steps are exactly as outlined above. Then, I die cut two more black butterflies. I brushed Mod Podge (Matte finish) onto the butterflies and adhered one to the front, lining it up exactly with the original and adhered the other to the back side. Having this much Mod Podge on the paper made it extremely pliable and easy to mold into the shape I wanted. This dried overnight and the next morning, the butterfly was quite solid. I then brushed a generous layer of Mod Podge all over the front and back of the butterfly and let it set another day. Finally, I added a pin to the back of it with hot glue.
The NAME was printed in black onto Daffodil Delight on the computer. Then, I punched 3 black decorative labels and stacked them up with the D. Delight piece on top using Mod Podge. I molded it to form a slight outward curve. The following day, this was added to the front of the butterfly with glue dots. I the photo below, I used our Crystal Effects over the dried original butterfly. It is FABULOUSLY shiney!! Looks like porcelain. The Crystal Effects seemed to take a little longer to dry but was really worth the wait!
I will be making more of these...to be sure! Please do not hesitate to email me if you have any questions about my projects.
Thanks again for stopping by!
Judy


I am very impressed with the way you SHOW and tell your instructions! This project is wonderful!! Thanks for sharing!!
ReplyDeleteThank you December! Glad you like the project and instructions. Hope it inspires you to play with this paper!!
ReplyDeleteWow, wow, wow!!!! This is awesome! :)
ReplyDeleteThank you Kim!
DeleteLove this tfs
ReplyDeleteThank You!! Glad you like it.
DeleteWonderful technique. TFS
ReplyDeleteThank you! Hope you will try it!
DeleteYour projects are drop dead gorgeous!! I love how you used the stamped image behind the die cut piece! I've never seen anyone stamp onto the DSP the way you did either...stunning! Not to mention the pin--it looks like something you'd buy in a boutique. My son loves monarch butterflies so I cannot wait to try all the new techniques you showed :) p.s. Sorry for the long post, but your talent has blown me away :)
ReplyDeleteThank you for your comment Tricia! Good luck making the butterfly. Feel free to email me if you have any questions.
Delete